Wednesday, 19 December 2012

3 Steps Forward, 2 Steps Back

Life moves pretty fast. If you don't stop and look around once in a while, you could miss it.
Matthew Broderick in the film Ferris Bueller's Day Off

Not a nifty dance move I'm afraid, rather a description of the slow and often repetitve moves that we have to make in order to cross this uncharted territory. While looking ahead and attempting an uncharacteristic shot at being proactive we realised that an obvious problem lay on the horizon. The gear linkage consists of a steel tube running inside a second, protective tube which doubles as a guide to keep the linkage straight and true. We have not extended the linkage yet but have realised that we shall not be able to slide it into the guide tube while the engine and gearbox are in place! Bother, bother, bother. So it's time yet again to remove the engine, and the gearbox will join it this time too.


It really does seem to get easier every time that we do it - practise makes perfect I guess, we are down to half an hour or so. I have been under an onslaught of the dreaded flu and have felt a bit weak and bunged up this past few days. I have counter-attacked with doses of medicine in the form of brandy which gave me strength and motivation (to a point anyway!).


The gearbox is oozing a little oil from here and there but seems to be in generally good condition. I'll give it a good clean during the week and examine it more carefully. I'll check around for the availability of new seals and perhaps do a mini service on it while it's out. Now that these parts have been removed I can see down the gear linkage guide tube and I'm sure that the next step, making and fitting the gear linkage, will run smoothly.

That's about it for, it's late and my "medicine" seems to be doing more harm than good so I'm off to bed. Happy new year everyone, updates to follow in the new year :)


Thanks for stopping by
CooP

Tuesday, 11 December 2012

Slip Sliding Away

Money never made a man happy yet, nor will it. There is nothing in its nature to produce happiness. The more a man has, the more he wants. Instead of its filling a vacuum, it makes one. If it satisfies one want, it doubles and trebles that want another way.
Benjamin Franklin


Not much to report this week but we did make a little progress between the slurping supping of some of Cape Town's finest export brandy. The sliding door "slider" has had a damaged spring on it for the past ten years or so. It prevented the sliding door from popping open smoothly when the catch was released and also did not hold the door away from the body panel. This has resulted in awkward opening requiring two hands, and a nasty gouge down the right-hand panel that will need a smear of filler. So we popped the door off and removed the suspect part. I also cleaned and lubricated all of the other moving parts for convenience while we had it all in bits.


After some exhaustive searching around the house, garden and shed I managed to find the unused slider from the left-hand sliding door that was fixed in place (see SlidingDoor? No More). Couldn't remember where I had put it - they say that the memory is the second thing to go, hee hee. Despite it's grotty appearance it was all in good condition and came up lovely and clean after being attacked with an old toothbrush dipped in petrol. A few of the individual parts are individually made for either the left OR right side but the spring and fastener that I needed was universal. Fixed, fitted and replaced with a dollop of grease and the job's a good 'un. It's working perfectly now, opens smartly and slides just right - it feels like new and is a testament to the original build quality of 40 years ago :)


Thanks for stopping by
CooP

Saturday, 1 December 2012

Trendy Gear

Our life is frittered away by detail... Simplify, simplify, simplify! Simplicity of life and elevation of purpose.
Henry Thoreau


I missed my regular Wednesday get-together but I managed to do some work on the gear stick. I assembled all of the parts that I could find from the two cars and gave them a good cleaning. I sanded off some light rust and then primed and painted them with rattle-cans.


The result was a smart gear stick with spotless fittings, very tidy!


Close up of the bottom end. This was caked with congealed grease and 40 year's worth of road muck but it came clean with some petrol and a wire brush. I accidentally managed to knock out the sprung pin while I was cleaning. It landed in a pile of leaves and took me half an hour to find again, clumsy oaf! I located it with a magnet eventually.


Thanks for stopping by
CooP

Thursday, 15 November 2012

CV Or Not CV?

Traveling in the company of those we love is home in motion.
Hunt


That is the question! Well, we have CVs again, all greased and fitted.


My friendly neighbour, as usual, generously gave up a few Wednesday evening hours to help out with the work. The CVs are all rotating lovely and quiet and smooth, like. Top job and I'm very happy.


I have been struggling for ages to remove the castle nuts from the wheel hubs in order to check out the rear brakes. So I lost my cool this afternoon and carved them up with an angle grinder. I have a pair of replacements on the white bus's rear axle, left over from the big chop. I'll just have to get those off without the grinder :).


The rear brakes on both sides seem to be in remarkably good condition considering that they have been living outdoors for the past ten years without maintenance or protection from the weather. The rubbers are still soft and flexible and the cylinders are still clean and rust-free. There was a little milky brake fluid left inside the cylinders that seems to have repelled moisture and kept them slightly lubricated, good stuff. The brake shoes still have lots of friction material and will be good to use still. After cleaning off some dust and a little surface rust we reassembled it all and called it a night.

A good evening's work and, as usual, a nice social get-together with a few cold ones to lubricate the way. Thanks again to Marius for the advice, brains, tools and hard labour - cheers mate!


Thanks for stopping by
CooP

Thursday, 1 November 2012

Grease Is The Word

To know you have enough is to be rich.
Lao Tzu

Thick, black, gooey stuff. We got clever this week and wore surgical gloves but we still managed to smear slimy lube all over the place. This could've been a lot more fun if Lynn was helping me!

I had a good look around for the correct replacement boots but couldn't find them, replica, pirate or otherwise. Strange really because Beetles and Kombis are still pretty thick on the ground - wonder where they get their bits? I managed to find some that seem to be intended for a later model, they're not identical but I'm gonna try and make a plan...


It took a bit of brute force and lubrication, these new rubbers are a tight fit, wooah. But I think that they'll work. We had to discard the metal cap as it is intended for a slightly larger joint. We packed loads of the black grease into the joints, and more and more until it squeezed right through the joint and out the back. Re-fitted the original crimped clamps where possible. One was damaged as they are not really meant to be re-used so I replaced it with a proper, screw-together clamp.


And there they are, completely assembled, greased and wrapped to keep them dust free in Lynn's best freezer bags :)

We'll fit them back onto Marigold on the next "work night".


Thanks for stopping by
CooP

Thursday, 18 October 2012

Stripping The Joints

You only live once, but if you do it right, once is enough.
Mae West

You have succeeded in life when all you really want is only what you really need.
Howard


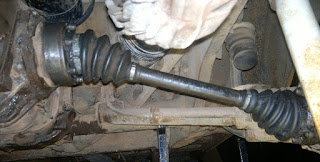
We whipped off the remaining rear axle shaft and stripped the C.V. joints. Careful to mark and number all of the respective parts, we cleaned them carefully and packed them into individual containers. Two of the protective rubber boots are damaged beyond use, the remaining two are probably still servicable. One of the joints looks slightly different to the other three - perhaps it has been serviced or replaced at some time. I asked my Dad but he can't remember ever having done this.


Close inspection shows some miniscule marking on the inner races of a couple of the joints. I doubt very much that this shall warrant replacement but I'll have them checked out by a pro during the week. Usually they are only replaced if badly pitted, very loose or making strange noises. These are fairly snug and ran quietly (when they last moved, five years ago!)

The one with the badly damaged boot had a clump of dried grease inside and is one of the two that has a little scarring. The remainder were packed full of gooey, slimy grease which was a real mission to clean out. New boots shouldn't be hard to source, although my favourite parts supplier has shut down. If someone has taken over the business of Beetle Beauties then please let me know - the shop has been cleaned out and there is no apparant forwarding address.


Thanks for stopping by
CooP

Thursday, 4 October 2012

Stiff Joints

One who does not know what is enough will never have enough.
Lao Tzu

While I was mucking about fitting new studs under the engine I noticed that one of the rubber boots was damaged and split. This is a protective cover for the c.v. joint* and is crucial for keeping grease in and dust out. I also noticed a huge wasp nest right next to my cheek, just an instant before I flinched violently and bashed my head! Sorry wasps, you'll have to go.

It's a fairly simple job to remove the 6 bolts on each end of the driveshaft/sideshaft and take out the entire assembly as one piece. First we just had to clear decades of solidified gunk from the hollow ends of the Allen-head bolts.


I've clamped it in the vice and removed the retaining circlip and other clamps so that I can remove the protective rubber boot. I'll properly be able to check out the condition of the joint and it's bearings and housings in good daylight, but the grease inside is fairly solid, shrunken and dried out so I reckon I'll have to remove them all and check thoroughly. Hopefully there will be no permanent damage and I can just clean 'em, grease 'em and replace 'em.

*Constant velocity joint, similar to a universal joint that allows a drive shaft to transmit power through a variable angle, at constant rotational speed, without an appreciable increase in friction or play. There is a lovely, moving graphic showing how it works at Wikipedia. Also known as a homokinetic joint (stop sniggering at the back).


Thanks for stopping by
CooP

Wednesday, 26 September 2012

What A Stud

Man is free at the moment he wishes to be.
Voltaire

Well we've had the engine out yet again! Getting the hang of it now, took less than 40 minutes. I fitted two shiny new studs into the partially stripped sockets at the lower end of the engine and glued them in with Pratley Steel epoxy. After setting for two hours we refitted the engine and tightened up all of the bolts except the two new ones. I'll let the glue set for a few days first before I tighten the nuts on that.


I'm making some progress with the roofing. It's not all square and perfect but it's made from donated scrap and has cost practically nada so far. It should help to form a barrier between me and the weather. It's certainly helping to keep the leaves and crap landing on the project - it's already covered in litter!


I discovered this nasty dent at the left-rear of the bus. Will need some attention before I put the bumpers back I suppose...later.


Thanks for stopping by
CooP

Thursday, 30 August 2012

Out With The Old

Earth and sky, woods and fields, lakes and rivers, the mountain and the sea, are excellent schoolmasters, and teach some of us more than we can never learn from books.
John Lubbock


The frame for the forthcoming roof is taking shape. Just a few more cross-pieces and I can start covering it. I have just a few sheets of galvanised, corrugated steel, not enough to cover much area, so until the finances improve I shall cover it with a large piece of shadecloth.


 A lot of the cabin equipment in the original bus has deteriorated horribly as it's all open to the elements. We've removed most of the old parts from the dashboard and surrounds, including the steering wheel and column. I hope that many of the bits will still be usable in the project. Other parts that are duplicated will either be kept for spares or sold, traded and given away.


The Blaupunkt radio was working fine when I parked the old girl on the slab so I'm expecting it to be servicable still. It certainly looks better after a wipe-down. The steering wheel was badly cracked in two places around the centre boss and I damaged it a lot more when it was removed from it's splined position on the steering column. Very brittle and too difficult to restore, methinks. Other parts such as the windscreen wiper motor and assembly still look like new and are well-greased and have very little play in the moving parts. I expect to test and re-use some of this stuff.


Thanks for stopping by
CooP

Thursday, 16 August 2012

It Lives!

Forget not that the earth delights to feel your bare feet and the winds long to play with your hair.
Kahlil Gibran

Last night after dropping the engine . . . again . . . we managed to realign the misaligned rear section of the cooling tin correctly and slid it back into place. It seems to get a lot quicker and easier every time we move this engine about - we had it out and back in under 40 minutes!

Unfortunately the lower-right bolt of the four main mounts came out with a bit of damaged internal thread attached to the main thread. It's stripped so the engine will have to come out yet again :(


Never mind, we nipped up the remaining three main bolts and the four that attach to the cross member support. Stuck in a battery and hotwired it for a test of all of our mods. And she runs! Not idling correctly but it's running pretty smoothly with no obvious rattles or squeeks other than the normal air-cooled noises. A major milestone reached and really monumental to me - luvverly stuff!


There is a nice steel bash-plate that protects the front of the underside of the gearbox . I imagine that it works quite well because it is rather battered but the gearbox beneath it appears to be unmarked. I've removed it to clean and straighten it up a bit.


Thanks for stopping by
CooP

Monday, 13 August 2012

O-Rings Made

Look deep into nature, and then you will understand everything better.
Albert Einstein


I bought two outsized O-rings from my local hardware store for a few pennies. I have trimmed them to size and glued them with a drop of super-glue. Not ideal for maintaining contact with oil, I guess, but 'twill have to do for now. I'll smear them with a bit of Vaseline before I fit them, whoopee!


I had to modify my original idea as the larger O-ring was too thick and the whole filter would not go together. I cut a substitute from thick gasket paper and fitted that instead. The original, flat rubber gasket is still there but compressed a little a allowing seepage. The paper one should fill that gap. I topped it up with about half a litre of oil (up to the red line visible in the top picture) and reassembled it. All looks good and no obvious leaks are apparant. I decided not to bother repainting it as it won't be seen by many people and I kinda like the slightly battered look that it now carries with 41 years of wear and tear. (Update, March 2014 - I changed my mind and gave it a lick of paint, click here to see )


Thanks for stopping by
CooP

Thursday, 9 August 2012

Clean Air

If the sight of the blue skies fills you with joy, if a blade of grass springing up in the fields has power to move you, if the simple things of nature have a message that you understand, rejoice, for your soul is alive.
Eleonora Duse


I have worked on the air filter and pipe today. The filter is a heavy duty jobbie that is part-filled with oil. This is designed so that the air through the oil and solid particles should be extracted and stay trapped. According to the M Plate it was chosen and fitted as an optional extra when the car was ordered. It seems to be in pretty good condition, apart from some gooey sludge and a missing gasket it is all there. Somebody during a previous service (long, long ago?) has replaced the gasket that divides to two main parts with a soggy trail of silicone sealer. I shall make a rubber O-ring to replace this as I cannot source the correct gasket locally. I don't think that rubber is the correct material for this but will check it often and carry on looking for the correct part.


I have also repaired the moulded rubber pipe that connects the air filter to the carburettor. It had split half way around. I made up two thin rubber O-rings from a larger one that I had bought for the swimming pool filter. I glued it up with the O-rings and lots of contact adhesive. It aint pretty but it should do fine until I can source a replacement. Of course the pool filter is still leaking but, och it's still wintery and far too cold for swimming...


Thanks for stopping by
CooP

Thursday, 2 August 2012

Engine Serviced

You will find something more in woods than in books. Trees and stones will teach you that which you can never learn from masters.
St Bernard


We finished giving the engine a full service last night. I fitted new high-tension leads to the new spark plugs, Drained the old engine oil and removed and replaced the mesh oil screen and all the related gaskets underneath. Chopped out the rusty tailpipes and partly fitted the new/second-hand ones that I got from Beetle Beauties last month. New tappet cover gaskets fitted and all of the electrical connections were remade. We topped up with lovely clean, new oil and were daydreaming about perhaps trying to fire it up later this evening...


We were just fitting the rearmost piece of the engine cooling tin that forms a near air-tight seal between the engine bay and the outside air when - BUGGRIT! We discovered that the piece that we DID remember to fit when replacing the engine is actually not fitted correctly and is stuck fast in the wrong position! Oh dear. We turned the air quite blue in frustration which of course did not help one bit. This means that the engine will have to be unbolted again so that we can slide it back slightly and re-fit the panel of cooling tin. Rather annoying but unavoidable so I'm afraid that the beastie will have to remain dormant for a little while longer.


Thanks for stopping by
CooP

Wednesday, 18 July 2012

Engine Back In

Every man dies. Not every man really lives.
Braveheart


Tank's clean, not too much trouble. Just got a wipe-down on the outside. For the inside I threw in a length of chain and spent a long, muscle-tingling hour shaking it all about. I managed to loosen most of the rust, I reckon, and then finished it off with a good rinse with clean petrol. New bits of rubber hose for the connectors on the breather tubes and a lovely clean fuel hose and filter to finish it off. I cleaned the copious fine dust from the compartment and replaced the tank this afternoon.


It took a bit of grunting and farting but with the help of the faithful neighbour we managed to rattle the engine back into place and bolt it up tight. Thanks mate! We are half way through giving it a service and have replaced points, condensor and a few other goodies. The tappets have been adjusted and the remaining service parts have been sourced from the helpful Charl at Beetle Beauties. Will finish the engine servicing during the week and we can look at starting her up again soon.


Thanks for stopping by
CooP

Saturday, 14 July 2012

Fuel Tank Out

Men, for the sake of getting a living, forget to live.
Margaret Fuller


Whew, fuel tank's out. A bit more struggle than I expected, owing to a pair of hidden bolts beneath the bulkhead that I took a while to discover. It was covered in fine dust but now looks brand new after a bit of soap and water. Inside a few spots of surface rust can be seen in the upper half but it's in fabulous condition for it's 41 years.


Thanks for stopping by
CooP

Wednesday, 6 June 2012

I'm Back - Engine Out

Man cannot discover new oceans unless he has the courage to lose sight of the shore.
Andre Gide

Update
Seemingly endless torrential rain left me in a very fed-up state and I've neglected the project for far too long. I've been employed six days a week and have not had a lot of spare time. Excuses excuses!

One of my VW-crazy neighbours has motivated me to get cracking again and even offered to help out with tools, time and labour - thanks Marius! I'll come and help you with yours on alternate Wednesdays. Ah yes, the good old barter system.

He has persuaded me that I'd me a lot more motivated if I was actually driving the beast so my immediate focus will be on engine, running gear, brakes and linkages.


Marius has popped over with his toolbox and his "hard-labour" head screwed firmly on. He almost single handedly removed all the dirty bits and crawled around on the cold floor to loosen all of the right bolts.


After lots of hemming and hawing and re-checking the manual (a.k.a. book of lies) we managed to find the correct bolts. Then it was just a "heave"and a "ho" and she was out on the floor. Lots of little bits to buy for the engine, mostly rubbery ones, yee-haaaaw. Next the fuel tank is coming out...


Thanks for stopping by
CooP
Related Posts Plugin for WordPress, Blogger...